Showing posts with label DIY. Show all posts

16 January 2020

Community Bike Shops - Part 3

Over the last few years, I have had the opportunity to visit a handful of community bike shops around the United States. This is the third of five posts to show the shops I've seen first-hand, even if I stopped by when they were closed.

Community bike shops (also called community bike projects or co-ops) tend to be non-profit organizations with brick-and-mortar locations that serve the specific bicycling needs of a community. Some have large budgets and paid staff, others are completely volunteer-run. Most shops have a mission statement, which is the best way to learn about what they do and how they operate.

The general model:
  • Reduce the barriers of entry to cycling by taking donated bicycles and parts to be salvaged, rebuilt, and sold at very affordable prices;
  • Empower people with knowledge of how to repair and maintain their own bikes with either classes or DIY shop space and tool libraries;
  • Host events; either for fun, education, or fund-raising; and
  • (From my experience) they also function as safe spaces for people to learn and hang-out.
The shops I've been to are geographically distant from one another, but the similarities are evident. I highly recommend seeking out a co-op bike shop in your neighborhood or the next time you are traveling. Supporting them with a purchase or donation is a great way to share the love of bikes with others.


Alexandria, Virginia

From their website: Vélocity strives to "grow and empower a more inclusive biking community through affordability, education, and embracing the fun of riding."


I stumbled upon the non-profit Vélocity Bike Co-op while visiting my mom in Alexandria in March 2018. We were out for ice cream in the upscale Del Ray neighborhood (Tacomans would equate this area to their Proctor neighborhood.) Rents are higher here and it seemed an unlikely place to find a non-profit bike shop. Even though the shop was closed, a set of night owl volunteers let us in to have a peek.


It's a relatively small space, covered with everything bike-related from floor-to-ceiling and wall-to-wall. Bikes for sale would normally be outside on the sidewalk during business hours, but they were inside for the evening and it was a tight fit to maneuver our family inside. With spring just around the corner, the volunteers were working hard to add more used-bikes to their inventory.


My mom hit it off with the volunteers, explaining our interest in their shop based on our own bike co-op in Tacoma, 2nd Cycle. You may recall that my mom enjoys riding bikes, too, and once I even shipped her a folding bike through the mail while she was stationed overseas.


We quickly learn that they warehouse their overstock at a separate location and focus on using this storefront for DIY repairs, parts and accessory sales, as well as some classes. Not wanting to overstay our welcome, we thank the volunteers for their time and efforts and leave a cash donation. They gave us a water bottle and an area bike map in return.


With the smell of old tires and grease still fresh on my mind, I make time the next day to tune-up Mom's Kettler city bike that she picked up while stationed in Germany. I was planning to take advantage of the Mount Vernon Trail, which partly runs along the Potomac River from Alexandria to Arlington and would connect me to Washington, D.C. Mom offers to babysit that evening and I set out after dinner for a 15-mile round-trip to the Lincoln Memorial.


Only a few miles into the ride, the bike starts gear-skipping. It had been fine earlier on a test ride. Isn't this always how these things happen? It's now dark and I can't seem to locate the exact problem. Deciding to press on, I find a gear that seems to minimize the skipping. No sooner had I reached the Lincoln Memorial and taken a photo, my phone died. Great. Good thing the volunteers at Vélocity hooked me up with a paper map! The trail is not well lit, but I feel better about finding my way back home with the map in-hand. Somewhere around the Ronald Reagan Airport, I pull over again under a bright lamppost along the trail to take another look at the skipping issue. It's driving me mad. With the bike flipped over I can now see a damaged link in the chain that's sticking. I soft pedal back to Mom's house, knowing exactly where I'll be heading the next day.


Back at Vélocity, we grab an open work stand and point out the damaged chain to a volunteer. The rest of the chain isn't worn out, so he points us to a bucket of old chains and suggests finding a similar one and harvest a link. This works great and is essentially a free repair. In the daylight, we spot a few Vélocity ball caps that we can't live without and make another donation to cover our shop time. It was great to fix the bike ourselves in the neighborhood, just like we would back home in Tacoma.

Stay tuned for the next installment as we check out more community bike projects.


28 August 2013

Get Creative: Decorate Your Helmet


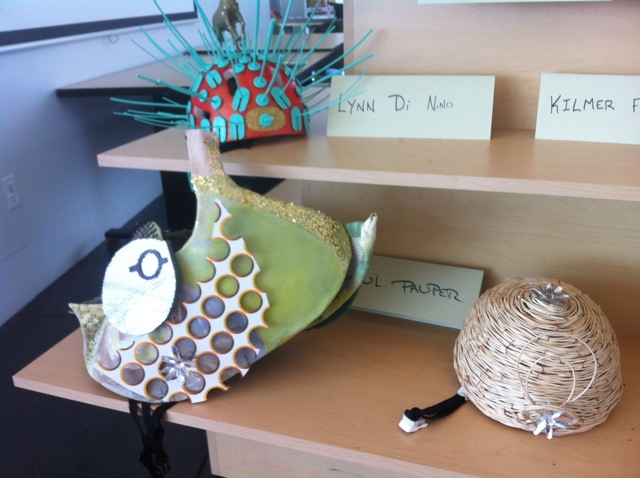
After Kidical Mass #4, I rode downtown to the Tacoma Art Museum where local artists were busy decorating bike helmets. (Many thanks to Tinkertopia owner RR Anderson for the heads-up on this event!)

According to TAM:
"Participating artists will receive a bicycle helmet to decorate, an assortment of mixed media supplies, receive 20 dollars of credit at Tinkertopia, and an honorarium of 50 dollars for participating. During the event there will be a ballot box for people to vote for their favorite helmet. At 3 pm the first, second, and third place will be announced.
After the festival the helmets will be on display at Tacoma Art Museum in the community art space until September 21. On September 22 during the Dome to Defiance Sunday Parkways bicycling event the helmets will be worn by special guests."
It was a beautiful day to work outside and every artist seemed to have a completely different design concept.


Some helmets were already completed and on display inside the museum.


Make sure you attend the Downtown to Defiance event on September 22 to see these works of art in action. TBR will be there to help with Kidical Mass #5: Point to Point. It's going to be rad. 


21 February 2013

Accessorizing EdgeRunner

Just a quick follow-up to my previous EdgeRunner build post. I had a few issues accessorizing the bike and wanted to show-off my work-arounds for anyone also building up a frameset at home.

The main problem was that my previous Xtracycle frame used a 27.2mm seatpost, which was small enough that a standard 1-1/8" stem could be attached to mount the stoker bars for my passengers. Like this:


The EdgeRunner frame specs said to use a 30.9mm seatpost, which I did, though I didn't think about how I would mount the stoker bars to that larger diameter. By looking at their site, I can see that Xtracycle has avoided this issue with their complete EdgeRunner bikes by using the smaller diameter seatpost and a shim. They obviously thought further ahead than me.

I rummaged through my spare parts and found a short stem that is also for 1-1/8" headsets, but clamps on a handlebar that is 31.8mm. So I flipped it around, mounted the handlebar end of the stem to the seatpost, and shimmed the stoker handlebar with bits of aluminum cans to get a snug fit. Like this:


My other issue was with the KickBack centerstand. The stand has a hard plastic plate that mates nicely with the round tubing of the FreeRadical when not in use, but the EdgeRunner has an oval shaped bottom tube which doesn't mate nicely with that same plastic plate. I bought one of the first KickBacks available and don't recall it coming with extra bits, but now I can see that Xtracycle provides the stand with plates for both tube shapes. I now have a oval shaped plate on order, but in the meantime I just wrapped the stand with an old inner tube to protect the EdgeRunner frame. Like this:


Lastly, the frame has a handy piece welded on specifically for mounting a fender on the small 20" rear wheel. The braze-ons use a slightly larger bolt than I have on-hand, so I just used cable ties and coroplast. Make sure it's not too wide on the drive side as the chain will rub when using the largest inner cogs. Like this:


With all of my nagging accessory issues out of the way, I get to just enjoy riding the bike.

Are you building up an EdgeRunner? Share a note or a link in the comments.

11 February 2013

Upgrading to EdgeRunner

My new EdgeRunner is finished! For those of you, like me, who can't wait to see it:


It shares much of the same fit/geometry/styling as my old Karate Monkey Xtracycle. Here's how the build went down. 

When the frameset arrived at Defiance Bicycles, I immediately pedaled down to check it out. 


I hauled it home on my Xtracycle (of course.)


My friend Brian followed me home on his bike and took this photo. Note the 29er wheels and all of that ground clearance!


Brian then loaned me a copy of Gerd Schraner's book The Art of Wheelbuilding, which I read cover to cover. The next day, with the help of a few friends and a case of beer, I built the rear  wheel using the Schraner Method. If you are thinking about building a wheel for the first time, I recommend using those three things: the method, the friends, and the beer.

My first wheel: an XT disc hub (salvaged from my broken wheel) laced to a 20" Rhyno Lite rim with 36 spokes. 


This may be a good time to point out that the EdgeRunner has 138mm O.L.D. spacing in the rear to accommodate electric-assist hubs. (My frame actually measured 138.9mm.) There is just enough axle on this 135mm quick-release hub to catch in the dropouts, but we did add a 1.5mm spacer to each side to help center it and take up the gap (per Xtracycle's build spec). The EdgeRunner frame doesn't have the same amount of flex that you might expect from a regular steel rear triangle. This build option seems to be working fine.

Starting on a weekend morning, with no where to haul the kids and while the LBS was still open, I started building the EdgeRunner. This was a bittersweet event because many of the parts were coming directly off of my Xtracycle. There would be no turning back.


[There's a crazy story here in the middle of the build here that involves me needing a tool, realizing one of my bikes had been stolen, finding the thief riding my bike, and me recovering it. While that wholly unbelievable part of the build took only four minutes, it will require it's own lengthy post. More on that later.]

My FreeLoader bags and V-racks are still in good shape. Five years of use and they are showing their age, but it's nothing a few iron-on patches can't fix. I may even toss them in the washing machine someday.


At the end of Build Day One, the EdgeRunner looked pretty good and the old Xtracycle looked like this:


I took a break to go on The Dead Winter Mob Ride around town. We stopped on the Murray Morgan bridge to take in the scenery and marvel at the fresh pavement. It was glorious.


The next morning I meant to finish the EdgeRunner, but became rather distracted by the fact that my Karate Monkey frame was finally available for mountain bike duty after these many years of cargo and kid hauling. It's going to be RAD.


Mountain bike day-dreams aside, Build Day Two was frustrating. I struggled to remove the adjustable legs from the KickBack centerstand. They were rather stuck with lots of rusty muck. Also, the taco plate in the middle was shaped for the round FreeRadical tubing and not the wide oval-shaped tubing of the EdgeRunner. At first I tried to widen the taco plate with a bench grinder, then a friend stopped by and pointed out that the plate should just be replaced with something flat.

In the end, I removed the taco plate and wrapped it with a strip of old innertube. The legs finally came out with some T9 Boeshield and a bench vise. I had to chop about 2" off of the legs (cut at the "0" mark) to get the kickstand properly setup for the small 20" rear wheel.


Overall, the build wasn't too bad. I still need to figure out how to mount my passenger handlebars. The EdgeRunner seatpost is a bigger diameter than the stoker stem I was using. I also wasn't sure I wanted a front derrailer, but the one I intended to try won't fit on the frame due to the position of the shift cable stop. Oh well. Gearing is 38x12-32 if you're wondering.

There is certainly more to follow about the EdgeRunner as we incorporate it into the daily routine. And more on that mountain bike, too!


14 January 2013

Tacoma's Pocket Libraries


A while back, Tacoma's RR Anderson built a pocket library in his alley called the Central Tacoma Free-Radical Media Exchange. A pocket library is a repository of books, videos, music and all kinds of other media that can be borrowed on a take-something leave-something basis. In my opinion, RR has built the coolest library in town, but more importantly, my kids think it's awesome, too.


We bike over there about once a month, returning books and cassettes that we borrowed the last time and looking for something new to take. RR has added a second row of shelves and nearly doubled the capacity of the space, which means it's hard not to find something of interest. On our last trip, the oldest picked up a copy of Roald Dahl's Fantastic Mr. Fox, which she immediately began reading on the ride home.


Just a few days ago, like the Lorax rising from the stump of a Truffula tree, a second pocket library sprung up around the corner from my house! It's superbly built and decorated.


Inside there's an assortment of fiction and non-fiction, as well as a note pad where you can leave comments. I left a note about the CTF-RME and plan to see if I can get the two pocket libraries intertwined somehow. Coincidentally, both of these pocket libraries are located between Oakes and Anderson streets, but 24 blocks apart. 


Apparently there are at least four pocket libraries in Tacoma, but here's where to find the two listed here. Take something with you to leave behind! You'll be surprised how empowering this kind of neighborly sharing can be.


07 December 2012

When Stuff Breaks: Fix it

I popped my cargobike off the kickstand on Wednesday morning and quickly realized that the rear tire was flat. So instead of giving the kids a lift, they rode their own bikes to school. We made up a song about Alderaan on the way and I forgot all about the flat tire. No worries; life is good.

The next day I woke early to change the flat tire before school. The tube had been punctured on the inner side, which was how I noticed this:


The rim is severely cracked along one of the welds. A burr of metal caused the slow puncture, and I'm guessing that this happened suddenly on Tuesday during a routine ride. These are 36 hole Velocity Cliffhanger rims, one of the "bombproof" varieties that folks talk about. I was surprised and deflated that they had failed, but more importantly, I had lost my primary mode of transportation.

As I've mentioned, I'm hopefully upgrading my Xtracycle to and EdgeRunner in January when they become available, so I didn't want to throw much money at this bike right now, if any. That (now broken) 26" wheel is actually going to be a left-over part of the build since the EdgeRunner uses a 20" rear wheel.

So I borrowed a small kid trailer from a friend so I'd have a way to transport my 4y.o. and told my 7y.o. that she may have to ride on her own more often. She's getting comfortable riding in the street and is starting to enjoy the independence of being on her own bike. With temporary solutions in place, my next project was to figure out what to do with the Xtracycle until January.

My plan is to build up the donor frame on the Xtracycle as a full fledged 29er mountain bike (sans FreeRadical.) Some of the parts for that project had already been acquired...including the wheels...you see where I'm going with this.

I installed some lightly used 700x38c road tires on the 29er wheels and made sure that they would fit in the FreeRadical frame. Installation was tricky: tires deflated and skewers removed, but I got it in there. It barely fits. 


Brake rotors and the cassette from the 26" wheels were moved over to the 700c (29er) wheels and I was ready for a test ride! Except that when I took the bike off the Kickback kickstand, I found that the non-deployed Kickback rubbed on the larger wheel. I installed a spare F.A.P. onto the FreeRadical kickstand plate to keep the Kickstand from retracting all the way back up. This bought me just enough clearance. Check out the whodathunkit look on my face: the F.A.P. has been in my parts bin for over 5 years.


Test ride time. The larger wheels effect the trail (tendency for wheel flop) and also raise the center of gravity, so cornering is much different.  Less nimble at low speed, but more stable at high speed. The skinny tires don't have much cushion to speak of and I actually had an egg in the front basket crack on the way home from the grocery store last night. Also, the clearance under the Snapdeck was so tight that it began to rub once it got a little wet and dirty under there. 

Most 700c Xtracycles are going to need the Riser Plugs that they sell. Since I knew my LBS wasn't going to have them, I made my own from a piece of 7/8" O.D. PVC cut in 1/2" lengths. (The PVC was a remnant that I had saved from making my DRT flag!)


The shims fit perfectly into the FreeRadical frame and raised the V-Racks and Snapdeck enough to give me the clearance I needed for passengering. "Whoa, this is weird!" said my 4y.o. as we headed out on the school run this afternoon. Those few inches of height make a noticeable difference. 


I'm still looking forward to the new EdgeRunner, but I'm really happy to have my Xtracycle back on the road.


09 November 2012

More DIY Rain Covers: Recumbent Tandem Edition!

Back in September we spotted this cool three-person bike parked outside our school. It's a tandem with a front recumbent stoker seat as well as a trail-a-bike. Pretty sweet.


This morning I had a chance to talk with Todd about his super cool bike. Not only has his trail-a-bike rider moved on to her own geared 2-wheeler, but the tandem stoker now has a DIY weather cover made from coroplast campaign signs and a repurposed stroller cover. 


Todd said it's worked great in more than a few heavy rains. On this 35°F morning I'm going to guess his stoker was much warmer than her sister, too!


26 October 2012

DIY Madsen Bucket Cover Frames

Folks have been asking, so here's more details.

Our Madsen rain cover frames are made from electrical conduit, specifically 1/2" EMT. It's light, cheap, durable, and very easy to work with. You'll want to use a pipe bender like this. You may be able to rent one from a home store or borrow one from a neighbor. It's a basic lever hand tool that is very easy to use. Measure twice, bend once. And make sure you are bending the conduit in the corrected direction!


The frame has only four pieces: two 10' lengths of 1/2" EMT (conduit) and two 1/2" couplers. Total cost is maybe $5. Ideally, the left and right sides of the frame are mirrors of one another and the couplers line up in the middle of the bucket. The structure sits on the edges of the bench seats; both benches must be used for the cover to stand on its own.

The frame can be covered with anything. I recently discovered that a burlap coffee sack from my local roaster is the perfect size and shape when you rip the side seams open. I added a piece of coroplast to the roof of this one to help dome the roof and take out the slack in the fabric.


To keep the whole thing from tipping out of the bucket, you need some sort of tensioner under the outer lip of the bucket to attach to the cover fabric. For our sewn covers, we used Sunbrella fabric and hemmed in a slot at the front and back to loop through a 1" web belt with some buckles.


In a pinch, the burlap coffee cover was attached with a length of rope and some zip-ties. Total cost of the burlap cover and frame: less than $10 and 2 hours of playing in the garage. This makes for a decent sun shade or windbreak, but wouldn't last long in heavy rain.


Related posts: